Beginning R Blends: BR, CR, DR, FR, GR, PR, TR


br, cr, dr, fr, pr, tr, gr

Games/Interactives


Printables


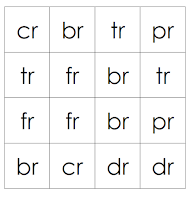
Beginning R Blends Tic Tac Toe


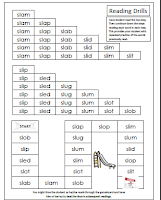
Stairs games have always been a winner in our phonics activity bag (and great for math too). You can write phonograms, math facts, letters, words, etc on the stairs and student must read the item (or do the math fact) to progress up the stairs. I sometimes place a treat at the top of the stairs (candy, sticker, picture card, etc.)


Beginning R Blends Stairs Game

Beginning R Blends Picture CardsBeginning R Blends Picture Cards


Sample 2 Day Lesson Plan for R Blends

Day 1:

  1. Go over Review flashcard deck
  2. Introduce new blends:
    1. Show flashcards and give sound of each new blend; (you might glue a picture of a word that starts with the blend on the back--see my matching cards) have student repeat sounds after you. 
    2. Do online interactive: Word Warehouse- R Blends
    3. Play Stair Step Game
    4. Have student read words and sentences with the R Blends (do reading drills, stair step game with words instead of the blends, tic tac toe, bingo, etc).
    5. Dictate words (or show picture cards) of words that start with the blends, have student write the blend that makes the sound found in the word (if you feel student can write the actual words, you can alternatively have them write the words)
  3. Wrap up by reviewing R blend flashcards having student reproduce the sound of each blend and/or make a visual for student's phonics notebook.

Day 2:

  1. Go over Review flashcard deck
  2. Practice R Blends
    1. Go over R blends flashcards (or use student's visual in notebook, if you made one the previous lesson, to review the sounds)
    2. Practice reading words and sentences with the R blends (game format is preferred, if not, just read lists and sentences)
    3. Clue game - give clues for words that start with the R blends and have student write the blend or word to match.
    4. Hop a Blend - my daughter likes this game. I call out words that start with the blends, she hops near the flashcard with that blend (or you could take it outside and draw the blends with chalk in circles or squares).
  3. Wrap up by reviewing R blend flashcards.


Our phonics notebook entries for R blends:


Beginning L Blends: BL, CL, FL, GL, PL, SL


Videos


Word Lists

Quick beginning reader lists:

bl - blab, blog, blob, blot, black, block, blast, bleed
cl - clan, clam, clap, clad, clod, clog, clot, club, clip
fl - flag, flap, fled, flip, flab, flat, flop
gl - glass, glad, glum, flob
pl - plan, plum, plot, plus, plop, plug
sl - sled, slab, slap, slid, slip, slam, slim, slit, slat

Printable Lists

Games

Printables

Beginning L Blends Matching Cards


Our Beginning L Blends Notebook entry


    Individual  L Blends:


    SL


    also included: SL beginning blend 2 sided flashcard*

    *SL Blends Learning Pack (Word version) - (I provided the Word document as the flashcard did not print out well on a 3x5 card in PDF form. You can print it directly onto a 3 x 5 card from Word:


    Other SL Blend Resources on the Net:

    "Tastes Like A Restaurant" Orange Chicken


    Last week I was in the mood for something different and I was walking down the store aisles trying to think of something to do with this chicken that I had just put in my basket.  In the frozen section I saw some orange chicken. I love Asian food so that settled it and I googled an Orange Chicken recipe right there on the spot and came up with this one at Food.com.

    There were many versions of orange chicken, some baked, some fried. This one fries the chicken in a batter.

    Ingredients (Amended)

    Batter:
    The original recipe called for rice wine in the sauce; I omitted that because of the alcohol.

    • 2 lbs boneless skinless chicken, chopped into bite sized pieces
    • 1 egg
    • 1 1/2 teaspoons salt
    • white pepper
    • oil ( for frying)
    • 1/2 cup cornstarch, plus
    • 1 tablespoon cornstarch
    • 1/4 cup flour
    Orange Sauce:
    • 1 tablespoon gingerroot, minced
    • 1 teaspoon garlic, minced
    • 1/2 teaspoon red chili pepper flakes
    • 1/4 cup green onion, chopped
    • 1/4 cup water
    • 1/2 teaspoon sesame oil
    • 1 1/2 tablespoons soy sauce
    • 1 1/2 tablespoons water
    • 5 tablespoons sugar
    • 5 tablespoons white vinegar*
    • Zest from 1 orange**

    *In some comments, reviewers said they used brown sugar instead of the vinegar, so I did too.
    **Could use orange juice as well

    A few notes about this recipe:
    • Several people in the comments said that this amount of orange sauce was not enough, so some even quadrupled it (which I did).
    • Many complained about the directions being confusing.  I amended the directions below to reflect what I did, but you can see the original recipe here.

    What to Do

    Cooking the Chicken:
    1. Place chicken pieces in large bowl, set aside.
    2. In a medium bowl stir egg, salt, pepper and 1 tablespoon oil and mix well, set aside.
    3. In a medium bowl stir together 1/2 cup of the cornstarch and all the flour.
    4. Fold the cornstarch/flour mixture into the egg mixture to form a batter. (This is what I did differently).
    5. Heat oil for deep-frying in wok or deep-fryer to 375 degrees.
    6. Add chicken, small batches at a time, and fry 3 to 4 minutes or until golden crisp. 
    7. Remove chicken from oil with slotted spoon and drain on paper towels; set aside.


    This was my chicken after frying! So happy with the results because I generally am no good at deep frying things.  This time deep frying, I used our candy thermometer that came with our candy making kit to get the temperature just right and I think that made all the difference.  I set the microwave timer and cooked the pieces for 3 minutes, sometimes a skosh longer.  It was hard to keep everyone from eating the chicken at this point and I got a lot of "yums" and this is "awesome."

    Making the Orange Sauce

    Now the instructions were also unclear here about the orange sauce because at one point it said "add the orange sauce" but didn't say previously how to make it.  So this is what I did:

    1. In a tablespoon or so of oil, I stir fried/sauteed the green onion, garlic, and gingerroot in a saucepan. (I put in the garlic last because I know it can burn quickly). At this point you could add the red chili pepper flakes, but I, unlike my kids, do not like spicy, hot foods, so I omitted it.
    2. Then I added the water, sesame oil (my new favorite thing), soy sauce, white sugar, and brown sugar (I just used the same amount as I would have for the vinegar--but I did make more than one batch worth so I adjusted it accordingly) and I added the orange zest (some reviewers said they used orange juice. I can't remember, I may have added some orange juice as well).  I stirred and let simmer for a few minutes. 
    3. Next, I mixed the 1 tablespoon of cornstarch with some water to form a liquidy mix, and I added that to the sauce and let it simmer until it thickened up.
    4. Add the chicken to the sauce in a skillet and let simmer for a few minutes.
    Chicken simmering in the pan

    1. Serve over rice (the recipe said jasmine rice, but I just used regular white rice and threw in some steamed carrots and broccoli, along with canned corn.)
    The final product!


    This was such a hit. One of my high schoolers came home from football practice and ate some and he said he thought it was from a restaurant at first.

    I encourage you to view the original recipe as well as the comments below it as they were very helpful for me.

    Popcorn Balls!


    For Eid, we made popcorn balls. They were super easy to make and tasty. I used a recipe from Taste of Home.com

    Ingredients

    • 7 quarts popped popcorn
    • 1 cup sugar
    • 1 cup light corn syrup
    • 1/4 cup water
    • 1/4 teaspoon salt
    • 3 tablespoons butter
    • 1 teaspoon vanilla extract
    • Food coloring, optional

    Directions

    1. Place popcorn in a large baking pan; keep warm in a 200° oven.
    2. In a heavy saucepan, combine the sugar, corn syrup, water and salt. Cook over medium heat until a candy thermometer reads 235° (soft-ball stage).
    3. Remove from the heat. Add the butter, vanilla and food coloring if desired; stir until butter is melted. Immediately pour over popcorn and stir until evenly coated.
    4. When mixture is cool enough to handle, quickly shape into 3-in. balls, dipping hands in cold water to prevent sticking. Yield: 20 servings.

    Things We Did:


    -7 Quarts of popped corn is about 28 cups. We used 3 bags of microwave popcorn which yielded around 28/29 cups.

    -I made up one batch of the sugary sweetness and poured it over the popped corn but it didn't seem like enough to coat them enough so I made another batch.

    -Our corn syrup had vanilla flavoring in it already so I probably could have skipped adding vanilla but I added it anyway.

    -We used two colors of food coloring (each batch of the sugar mixture was a different color). Although you can't really see it in the pictures, our popcorn balls were red, green (and yellow from the popcorn itself)

    -We got about 31 balls, not sure how big each ball was, we might have made them smaller as we got more balls than the 20 the recipe says it yields.


    Our mixture bubbling


    Right after we poured the mixture over the popcorn


    These were really good and pretty easy to make, however they make you feel like you want to run to brush your teeth directly after eating them :)

    Easy Cornbread!

    Cornbread

    This is a super easy recipe and great if you like really sweet cornbread (if not, just decrease the sugar). I whipped some of this up the other day for our chili.

    What You Need:

    1 cup all-purpose flour
    1 cup yellow cornmeal
    2/3 cup white sugar
    1 teaspoon salt

    3 1/2 teaspoons baking powder
    1 egg
    1 cup milk
    1/3 cup vegetable oil

    What You Do

    1. Preheat oven to 400 degrees F (200 degrees C). Spray or lightly grease a 9 inch round cake pan.
    2. In a large bowl, combine flour, cornmeal, sugar, salt and baking powder. 
    3. Stir in egg, milk and vegetable oil until well combined. 
    4, Pour batter into prepared pan.

    5. Bake in preheated oven for 20 to 25 minutes, or until a toothpick inserted into the center of the loaf comes out clean.

    That's it! 


    Just for the record:  I didn't have milk on hand but we desperately needed something to go with the chili. So, being desperate, I used the half and half we had on hand, mixing 1/2 cup of half and half with 1/2 cup of water. Everybody raved about it. I would probably decrease the sugar a bit the next time, but the kids said this was the best cornbread I made ever!

    Streusel Topping

    Streusel Topping

    If you've never made streusel topping for your quick breads such as muffins and banana bread, you definitely HAVE TO give it a try. It really spruces them up by not only making them look prettier but also making them even more tasty!

    I have been putting streusel on my banana breads for years and yesterday I branched out and tried it on some cinnamon quick bread that I made. I've tried many recipes over the years, but I found one the other day and it's the best one I've made yet!

    After mixing up the streusel, you top the bread/muffins with it THEN you bake it.

    Streusel Topping

    What you need:

    • ½ cup packed brown sugar
    • ½ cup all-purpose flour
    • ¼ cup quick-cooking oats
    • ¼ cup (4 tablespoons) butter, room temperature

    What you do:


  • Mix together brown sugar, flour, oats and butter until about pea-sized crumbles form.


  •  Top the muffin batter with the streusel topping, then bake.


  • My 11 year old made banana bread all by himself this week (under my supervision and it sure was fun) and we used the streusel topping. This is the consistency after we mixed it up:


    And this was our banana bread after baking:


    Tangram Fun!


    A few months ago, one of the kids pulled out one of our tangram puzzle sets and started playing with it casually (not as they were "intended"). I had some down time and so I decided to show him what the tangram puzzle was about.  Tangrams are great because not only are they fun, but they are also educational. They help students use logic and develop spatial skills.

    What are Tangrams?

    If you are not familiar with tangrams, they are a set of 7 puzzle pieces (each piece is called a "tan")
    The objective of the puzzle is to form a specific shape (using all seven puzzle pieces), given only an outline or silhouette of the shape.

    For example, given this outline:


    You would try to replicate it with your tangram set (as we have done here):


    The tangram set is reputed to have been invented in China over a thousand years ago and brought to Europe via trading ships in the 19th century.

    A tangram set consists of the following shapes:


    • Two large right triangles 
    • One medium sized right triangle 
    • Two small right triangles 
    • One small square 
    • One parallelogram 

    Tangrams are great fun for kids of any ages (and adults). For the younger kids, they often enjoy just playing with the shapes on their own. My ten year old, 15 year old and I played a good hour or two the traditional way,  trying to reconstruct shapes from outlines.

    Where Can You Get Tangrams?

    I was fortunate to have received our tangrams sets in manipulative kits that we got from our homeschool program (I think from our Saxon or Houghton Mifflin sets or both--we've got several tangrams sets, alhamdulillah)

    But you can purchase tangrams, or even make your own!
    If you want to make your own, you can print out a tangrams template onto paper (preferable cardstock as it is thicker). You could even use the template as a guide to cut out tangram blocks from foam.

    Here are a few places to get tangram templates:

    Tangram Puzzles - Outlines/Silhouettes

    When you've got your tangrams, it's time to find some outlines or silhouettes to play with. Some tangram sets actually come with books that have outlines to use, which is great. But if you don't have outlines, here are some places online to find some (plus your local library may have some as well):

    Virtual Tangrams

    If you are on the go or just want to have tangrams fun on the computer or a mobile device, you can find tangrams games and virtual tangrams sets too:
    So, if you are looking for an activity that is educational, yet at the same time fun, tangrams are a low to no cost option. 


    Homemade Syrup


    I made some banana pancakes this morning before realizing that we didn't have any syrup. So I googled some recipes for homemade syrup. I love making homemade versions of products that I would normally buy at the store. It's so rewarding when they come out right.

    What you need

    • 1⁄2 cup brown sugar
    • 1⁄2 cup granulated sugar
    • 1⁄2 cup water
    • 1⁄4 teaspoon vanilla
    • 1 pinch salt
    What you do

    1. Microwave for 50 seconds. Stir.
    2. Microwave for 50 seconds more or until mixture boils. Stir.
    3. Serve hot or let cool.


    You may have to adjust the cooking time due to microwave variations. You can also cook it over the stove top as well. 

    The recipe is from Food.com. One of the commenters suggested starting with 1/3 cup of water. I didn't see the comment until after I had already made up my batch (and I didn't measure my water) so I ended up having to add more of the sugars. So I definitely would recommend adding a smaller amount of water first and then adding water as needed for consistency.

    Our syrup:


    Prime & Composite Numbers

    A prime number is a whole number greater than 1, whose only two whole-number factors are 1 and itself. The first few prime numbers are 23, 5, 7, 11, 13, 17, 19, 23, and 29. (Source)


    A composite number is a positive integer that has factors other than just 1 and the number itself. For example, 4, 6, 8, 9, 10, 12, etc. are all composite numbers. The number 1 is not composite (nor prime) (Source: Math Words.com)

    Activities & Games


    Activity: Use a Hundred Chart to find all prime numbers up to 100 using The Sieve of Eratosthenes (scroll down just a bit to find it.) To make things easier, try this Sieve of Eratosthenes Worksheet. You could also do the activity on this one which is nice because you can write the definitions of prime/composite numbers on it as well, so it's awesome for notebooking-it just doesn't include the instructions.) Also Prime Number Hunter from Education.com


    Activity:  I like to have my kids memorize the first 10 prime numbers or so as it will be useful for prime factorization (which we also use to simplify fractions).

    My Prime/Composite/Prime Factorization Pinterest Board

    Learning to Read/Reading Skills

    Learning to Read

    TJ Reading Resources at a Glance
    If you know what kind of specific resources you are looking for, start here:
    (updating of links in progress: 1/2019)
    If you are new to teaching reading and don't know where to start or what to do (don't panic), continue reading below  to get a road map of how reading is generally taught and how you can get started.

    How to Teach Your Kids to Read

    How it started for us

    I remember the panicked feeling I got when it hit me that had to teach my kids to read. Not a school. Me. I was so overwhelmed and didn't know where to start. I had no clue. Sound familiar?

    Since the internet was brand spanking new when I started homeschooling in the late 90s, I headed out to the library to research how to teach reading. And let me tell you, there are a lot of theories, opinions, and methods. I tried this method and I tried that method and nothing was really working. Then one day, THE light came on. Right before this, my oldest had been attending kindergarten at a masjid (mosque). That only lasted two months when my husband came home one day and announced that "we" (read -->I) were going to homeschool--but that's another story). But back to this particular time when I had picked up some books at the library. One book was Get Ready to Read! by Toni Gould. Something in those books seemed familiar to me. Fortunately, I still had a workbook from my son's brief kindergarten stint and I noticed that the workbook was written by the same author. The methods in her book were the same as this workbook which I liked. And her method made so much sense. This was the day I discovered Phonics. From that point on, I researched phonics and decided that this way, was the way for us (as opposed to other methods such as whole language). And that was our beginning road to reading. 

    In all, I've taught 7 of my kids to read and I have 2 more to go, in shaa Allah.  If you are just starting this journey and feeling panicked and confused, trust me, I've been there--and more than once. Each child is different so your experiences will be different. One of my kids was 4 when she got the hang of phonics and one of my kids was 11 by the time he was fluent.  

    I've discovered though, that there are basic steps in teaching a child to read:

    Where to Start:

    When you are just starting, you need to develop the following first:

    • Alphabet Recognition (some people say learning the names is not necessary at this point, but I always start with this)
    • Phonemic Awareness (this is learning the sounds that the different letters (a, b, t, etc) or groups of letters (ck, ch, etc) you can teach this through the use of Phonics)
    • Sight words vocabulary (words that generally cannot be sounded out or just high frequency words that students will encounter in their reading. I generally start this once my kids can read short vowel (CVC) words such as cat, hot, and bit where the words have the pattern of a consonant followed by a vowel followed by another consonant)
    When your student is an emerging reader, transitional, or fluent reader, the following skills should be developed/improved:
    • Vocabulary Development
    • Fluency
    • Comprehension
      • Before/During/After Reading Strategies
      Once your reader is a fluent reader, you move towards teaching literature (plot, theme, setting, etc)

      Stages of Reader Development

      By the Grade Resources

      (links to be restored, inshaa Allah.)
      • Grade 1
      • Grade 2
      • Grade 3
      • Grade 4
      • Grade 5
      • Grade 6

      Sight Words/High Frequency Words

      Teaching Sight Words

      What are sight words/high frequency words and how do I teach them?

      Arabic Vocabulary


      Arabic Vocabulary Teaching Aids

      Arabic Alphabet Charts