So you've decided that homeschooling is for you (or, at least that you want or need to give it a try). You're probably feeling overwhelmed and/or confused as to what your next steps should be (been there, done that). In many ways, you are fortunate because there is a wealth of information out there. When I started homeschooling, there were just a handful of sites that offered advice and information on homeschooling; the opposite is thankfully true today, alhamdulillah. I've gotten asked various questions over the years regarding how to get started, so I thought I'd throw my hat into the ring as well.
Below I outline a series of steps for getting started homeschooling. Except for the first step (which you may have done already), you could really do them in another order. I just enumerated them by what was one logical sequence to me.
You may want to get a notebook or even a binder (probably better) started because during this endeavor to get started, you'll come across a lot of information and you want to stay organized so that you can refer back to that information as needed. (Organization is a skill you will definitely want to try to master during homeschooling, trust me).
1. Check Homeschooling Requirements for Your Locale

States and provinces differ on their homeschooling requirements but it is usually on this level that you want to start looking for information as to what is expected of you. In some states, like mine, you must register as a private school to homeschool independently, in others you may simply have to register as a homeschool. Some states require portfolios and attendance records to be submitted regularly throughout the year, some don't. In some states you may have to meet with a teacher. You should be able to find out what is expected of you as a homeschooler, by visiting your state's department of education website. In other countries, I've noticed that these are sometimes called the ministry of education. You can google state education departments or
stop by this site which currently has links to each state's education department websites.
Binder Tip: You may want to set up a tab/divider with this information in your binder (perhaps labeled "Legal Requirements" so you can refer to it when you need it. For my state, you have to fill out an affadavit with your school information so this is a handy place to keep a copy of it.
2. Find Out What You "Should" Teach
Once you know what is expected of you legally as far as homeschooling, the next thought that probably comes to mind is "What should I be teaching?" Well, you are the educator, principal, superintendent of your homeschool, so in essence, you have control over what you will teach. Some states require certain subjects to be taught, so you'll probably want to begin this portion of the search back at your state education department if you didn't already come across this information.
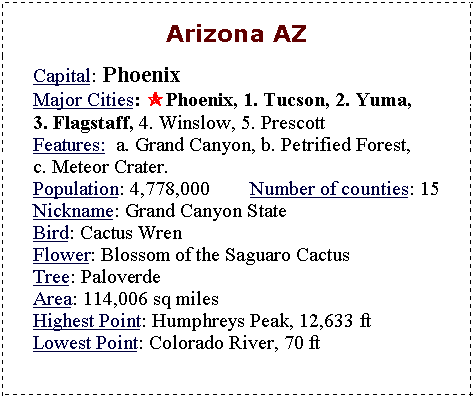
The typical core courses for education are: math, English, social studies, and science. In high school, students will also take electives and in lower grades, art and programming are common "extra" classes. You could add sewing, home economics, and religious studies etc. One resource that has been very valuable over the years for me in deciding what specifically to teach, is the
World Book's Course of Study section where it not only lists the typical classes taken per grade, but also lists "standards," that is, specific topics and skills or expectations for a given grade level (Preschool to Grade 12). Other resources that I have used to see what is generally taught at different grade levels are online table of contents of textbooks.
A Quick Word About Grade Levels:
In the course of homeschooling, you may very well find that your student is "on grade level" for his/her age in some topics and behind or ahead of grade level in others. This is VERY NORMAL in homeschooling. SimpleHomeschool.net has a great article on Stepping Outside the Grade Level which I highly recommend you read. The best approach is to tailor your homeschool curriculum toward each individual child. If he/she would be in 4th grade, but needs 5th grade English or 3rd grade math, then that's what you should give him or her. You can use traditional grade levels as a starting guide, but don't feel bound to them by any means. As the Homescholar put it:
"Focus on providing a curriculum that is challenging and not overwhelming. Be sure to keep it academically rigorous and encourage them to do their best, but guard against burn out and overwork that can lead to frustration."
One beauty of homeschooling is that you can choose the materials to accurately match your student's level in each subject.
Binder Tip:Label a section of your Binder, "Course of Study" and put the information from this portion of your homeschool search in that section. When you have definitively chosen your subjects, you may want to fill out/make a Course of Study form (
DonnaYoung.org has some great ones) which list the courses for a given year as well as the books/resources you will use.
Now as I said, the next steps do not have to necessarily be undertaken in the steps outlined below. Maybe for you, not all are necessary.
3. Discover Your Child's Learning Style

If you have more than one child, I'm sure you have realized that they each have their own strengths, weaknesses, and interests. One advantage of homeschooling is that you can pick curriculum or teaching methods that fit each child. Some children may do better with a hands on learning approach while another child may learn better through listening. As with anything, you can google and find inventories, quizzes/tests or simply articles to read. To help you get started, I offer a list of some below:
Binder Tip: You may want to have a section for each student in your binder and keep information like this in that section for a specific student or you may have a section labeled "Learning Styles" and keep all of this information for all kids handy there.
4. Explore Homeschooling Methods and Approaches
So you thought you were ready to start picking curriculum? Well, you can, but you should know (if you already don't) that in homeschooling there are many approaches and philosophies and being familiar with them (as well as your child's learning style) can help give you direction for your homeschooling as well as aid you in selecting a curriculum that is a good fit for your child.
Among the homeschooling approaches, these are among the most popular:
School At Home
You use traditional school textbooks, you set a typical public school like schedule; essentially you replicate school at home. This approach is what many homeschoolers typically start off with because it's what they know. For some homeschoolers, this works and they stick with it throughout their homeschooling journey. But for perhaps the majority of homeschoolers (or at least a good portion), they quickly (or may eventually) find that this brings about too much stress for mom or dad and the kids. If it works for you, that's awesome. But if it doesn't, don't be alarmed. Try something different. And that's where researching the different methods now, can help.
Among the other methods:
- Computer Based/Charter School Learning
- Classical Education
- Charlotte Mason
- Waldorf
- Montessori
- Unit Studies
- Eclectic
- Unschooling
and there are others.....
Now, other homeschoolers have written more eloquently than I probably can on these methods, so I provide you with some resources where you can learn about these approaches as well as other approaches or methods of homeschooling:
5. Select a Curriculum
One of the biggest parts of homeschooling is, of course, choosing your curriculum. The original definition of curriculum is actually the subjects and courses taken. In homeschooling, it has come to mean the resources that you will use to teach. Keep in mind though, that curriculum does not just mean textbooks.
There are so many options when it comes to homeschooling curriculum, it can seem overwhelming. Here's a brief look at different types of curriculum. There are many more......
Out of the Box/Full Curriculum
Many companies offer a full curriculum already set up for you, based upon the grade level of your child. These tend to be very costly for a great deal of homeschoolers. But if you have the money and/or you want to have everything already planned out for you, this may be an option. An example of this would be
BookShark.
Computer/Distance Learning
This is where you homeschool through a program that typically sends you the books and materials you need to homeschool (sometimes the materials can be accessed online instead or in addition). Some may offer teacher services where you are assigned a teacher to help you grade/teach or advise.
These can be costly as well, but there are more affordable or free options available. A much more affordable option includes programs such as
Time4Learning, which is totally computer based and it keeps records/track of your student's learning (though it does not offer high school diplomas). It's about 20 dollars per month.
There are free options as well, which technically fall under public charter schools. Some examples of these include:
We have used these two programs in the past. They provide all the textbooks for free and have an online interface where students access lesson plans, lessons, and take tests and quizzes. Work samples are required to be submitted on a regular basis and you are assigned a teacher that you must meet with typically once a month to turn in work. Students (typically grades 2/3 and up) are required to sit for standardized testing in the spring of each year.
Local Charter Public Homeschool Options
We discovered these a few years ago. They are basically the same thing as K12 and Connections Academy, however there is a local brick and mortar charter school where you meet monthly with an assigned teacher to submit work. They provide the textbooks for free and tuition is free as well.
I am not familiar with other states, but some examples of this (in California) are:
- Learn4Life.org
- iLeadExploration (this is the school we will be schooling through this year, in shaa Allah. It is available in Los Angeles, Orange, San Bernardino, Kern and Ventura counties in California) In this program, the parent gets to select the curriculum. Many of the other public homeschool program typically just use public school textbooks.
These can be nice options if you can't afford a lot of textbooks or want/need some guidance.
Put Together Your Own Curriculum
Instead of buying a full curriculum, you can pick and choose your resources for each class on your own. There are hundreds of homeschooling companies that offer homeschool curriculum. An example of a company that offers homeschooling resources is
Rainbow Resource which is very popular as it has such a comprehensive selection and the prices tend to be cheaper than other sites.
For most of our homeschooling, however, I never really purchased textbooks or materials. For 10 years, we lived overseas and had no way of receiving mail (or in some cases it was just too costly), so I put together my own curriculum through free textbooks, workbooks, and lessons that I found online. In addition, I have made a lot of my own resources (lessons, worksheets) as well.
When putting together your curriculum, don't forget to look beyond textbooks. You can find online lessons, such as the video lessons from
Khan Academy, which are free. You can find PowerPoints such as those at
Pete's PowerPoint Station.
When I started homeschooling, there were not so many resources for homeschooling. Now, the choices are staggering. And many are free. If purchasing a curriculum is not really an option for you, look to the internet and even your local library which may have textbooks that you can check out. In our early days of homeschooling, we discovered a "book bank" which offered thousands of old school books from public schools for free, so look around for those as well.
6. Organizing Your Homeschool & Creating Study Spaces
Organizing Your House
Point blank---It's hard to homeschool in a messy, unorganized home. That's just reality. And you may find that while homeschooling, your house is never up to the level of cleanliness that you think it should be. That's also reality. But everything that you can do to get your household running smoothly will go a long way. So, if you haven't, set up chore schedules and laundry schedules, get rid of junk.
Organizing Your Days
Now, I'm not just talking about school day schedules. I'm talking about your whole day. Schooling is just one aspect of your day. The rest of your life makes up the rest of the hours and you'll want to get it organized. In turn, that can help your school day run more smoothly, in shaa Allah.
I recommend starting with two things to organize your day:
- For Muslims, start with the prayer times and build everything else around it. If your children are too young pray, well, you've still got to pray. Establishing "break times" around the prayers will help you get your prayers in and help older kids establish the prayers.
- Secondly, establish morning and evening routines. You don't want your kids to just get out of bed and "do school." They've got to eat, groom themselves, and help out with chores to keep the house running more smoothly. Build these routines first (and then be diligent about your kids following them until they become second nature).
Organize Your School Year and Days

Start off by defining your school year.
Will you homeschool year around? Will you homeschool the traditional nine months and break for the summer. Some homeschoolers homeschool year around and then take a week break every 4, 6, or 8 weeks, for example. This method worked well for us because in the beginning, I didn't schedule any breaks and we would get burnt out and take an impromptu break (which is not necessarily bad). But I found that working hard for x weeks and taking a scheduled break was very motivating and perhaps lead to less burnout, Allahu ilm. Google around for examples of different homeschool schedules. Don't forget to include holidays as days off in your schedule if you observe them. Muslim homeschoolers typically take off days for Eid and Ramadan and you could also take off voluntary fasting days such as Yawmul Asharah or Yawmul Arafah to encourage fasting and provide a short break. Once you decide, it's a good idea to draw up a yearly calendar and distribute it to your kids (and post it on a wall as well) so they can know what to expect.
Define your weeks and days
There are many ways you can structure the school days and weeks. Some school for the traditional Monday - Friday. Some school for 4 days (Monday - Thursday) and have Fridays off. Some school over the weekend and leave a work week day or two off so errands can be run without interrupting the school day or so that field trips can be taken when places are open. Define your work week. Again, you can start off with the traditional school week and tweak as you see what actually falls into place for your family.
For your days, you can use a traditional school day schedule, with specific time periods for each subject everyday. You can do block scheduling where you set up chunks of the day (a morning session and an afternoon session, for example). You might choose to only do certain subjects on certain days of the week or study science this week and social studies the next. You have that flexibility. You don't have to do all classes everyday (though most feel good about keeping math and English a daily thing). When I started homeschooling, most resources I read said to get math and English or more stringent subjects out of the way in the morning and save the afternoon for lighter subjects and projects. But sometimes the afternoon seemed great for math for some of my kids whereas for others, it was best to start the day with it.
And how many hours should you homeschool? Some people spend all day homeschooling. Some only spend the mornings. You might start off with a traditional schedule and then gradually make changes as you see fit. You can surf online for examples of school day schedules. Once you've got a schedule in mind, write it down on paper and share with the kids. You may also find that the schedule you keep depends on the curriculum you choose so if you set up a schedule later but find that it won't work for your curriculum, you may need to tweak it at that time. And, although it may be easier (for you) to keep all kids on one schedule, doing the same subjects at one time, in reality, it might not work out so well for the kids (some might finish way ahead of the allotted stop time, some may still be working at the cutoff and need a great deal of time more). Flexibility is key in homeschooling, you've got to try to balance between what is good for the kids and what you are able to deal with as well.
Organizing Your Study Space(s)
Notice I didn't say homeschool classroom? Many homeschoolers have a dedicated room for homeschooling, like a classroom. Some have a dedicated area of a room (such as the dining table or a corner) for a study area. Some have, well, neither. Sometimes we've had a schoolroom or area, sometimes my kids have studied in their room, sometimes my kids have studied in MY room. My husband believes that sitting at a table or desk is the best. In my experience, the best has turned out to be sometimes on my bed with several kids surrounding me so I can help them as needed. You might start out with desks or using a table but find that for some of your kids, lying on their bed studying works for them. And, don't be alarmed or disheartened when you see all the beautiful homeschool classroom pictures online. If you are able to set up a dedicated room or area, that's awesome. But if that's not possible due to finances or space constraints, make do with what you do have/can provide.
I've found some really cute classroom decorations at the Dollar Tree or the 99¢ store. So if you are on a tight budget, be sure to check those places out. I've found some great calendar wall displays that you might see in a classroom, for example, and they are just a buck! Sometimes you can find places online, such as government agencies or organizations, which will send you posters that you can hang up. And finally, if your finances, don't permit, you can find a lot of neat resources from fellow homeschoolers online or make your own! And, there have been times, like now, where I don't have a single chart, calendar, reference chart, etc. up on the wall--but learning still takes place.
Lesson Planning
Once you have selected your curriculum, you'll need to plan it out (unless you purchase a curriculum that plans out the days for you). A simple way to plan is to plan for the year by taking a look at your textbooks or resource books, calculate the available days you will have for instruction and divide it by the number of pages or lessons in the book. This method is simple, but sometimes not the most efficient. For example, some concepts may take longer for your student to grasp and you may want to spend more days on a lesson than just one.
Some homeschoolers plan for an entire year at once. Some homeschoolers plan by months, some by weeks, and some day by day. I really don't recommend day by day planning as I did that for many years and it can be very stressful. I suggest planning for the year if you are able to and tweaking as necessary, but if a week ahead is all you can get, well that's something. Preparation is key ---as Benjamin Franklin said, "Fail to plan, plan to fail." I've found that to be so true in homeschooling--so as hard as it may be for some, try to conquer that lesson planning. You don't want to wake up each day and just wing it. You need to have some type of goal to work towards (which lesson planning provides) On the other hand, I've fallen prey to overplanning --making up elaborate lessons that were just too grand and didn't get finished because they just weren't practical. When planning your lessons, do try to go beyond the textbook with audios, videos, PowerPoints, games, living books, and field trips, but sometimes, doing a lesson right out of the book is ok too.
The beauty of homeschooling is that there is much room for flexibility. So while I suggest planning for the year as much as you are able to, realize that your "year" can be 12 months. Or 13 or 14, etc. If you are using textbooks, at the very least, see how many lessons you will need to do to complete it and make a list of them and use it as a measure of progress. If you remember your own schooling years, you got a lot of the same stuff in math and language year after year. So, if your child has mastered a topic, say nouns, there really is no need to keep doing the same type of grammar exercises in nouns, each year. That can save you some time to concentrate on the topics that are more challenging. Make your curriculum fit your student, not the other way around. And, by the way, if you decide to change your curriculum mid year, know that many others have done that as well.
Homeschooling is a wonderful experience. But it is also a challenging one. You may have some students who will work hard and get their work done and others who are just not interested or motivated and provide a great amount of resistance. In homeschooling, there is truly no one size fits all schedule or curriculum and you have to be open to being flexible to respond and try something new when what you are doing just isn't working. It's tough, but just because it's tough doesn't mean you can't do it. Some will graduate their homeschoolers. Some will try homeschooling and eventually revert to or turn to public or private schooling or tutoring. The key is to do what you think is right for your kids and don't worry about what others are doing or what they will think.
Phew! Feeling overwhelmed? That's normal. I've been homeschooling for over 18 years and sometimes I still feel overwhelmed sometimes or like I am back to square 1. If you can find a support group whether online or in person, that can make a big difference for you. There will be a lot of trial and error. Embrace it. And remember, homeschooling does not have to be school at home. If it works for you, great, if not, don't despair. The purpose is to educate our children; yes, we give them knowledge that they can take out into the world and use/apply. But it also includes helping them develop the powers of reasoning and judgement and coping and other skills to make it as a mature adult. And a lot of that you can't get from books. You get from life. Don't get so bogged down with homeschooling that you forget to live. Embrace the lazy days where you may not crack open a book but you stop and smell and discuss the roses which leads to a discussion of the beauty of creation and ultimately why we were put on this earth. Or, you decide that you want to try a new recipe and everyone is in the kitchen helping out, getting an impromptu math lesson on fractions, and learning to be a part of a team. Or you read a news article about a recent event and you spend hours discussing it, giving an impromptu lesson in geography and history. This all is education. This all is homeschooling.


 “The Indus Valley Civilization was one of the world's first great urban civilizations. It flourished in the vast river plains and adjacent regions in what are now Pakistan and western India.” (Harappa.com).

 Seterra (downloadable game)


